It’s believed that ancient Romans were the first to write “cheques” known as praescriptiones in the 1st century BC. They also invented socks, but we’ll cover that at a later date.
Just 15 years ago, writing a check was a ritual that people took part in every single day. Many below the age of 20 have only had to write checks on a rare occasion, if at all. Does writing a check seem like a useless skill in an era dominated by mobile banking and apps like Paypal and Venmo? Though writing a check may no longer be part of day-to-day life, it’s most certainly still a part of paying rent and utilities at many apartment buildings. This is especially true if you’re living with roommates. Once you get your own apartment, you’re likely to be faced with this daunting task.
Need to jog your memory on how to write a check so you don’t write up a mess? Perhaps you’re even signing your first check ever. No matter how much or little experience you have with these special sheets of paper, there’s no need to worry! Check out our easy step-by-step check writing tutorial below.
Step One: Anatomy of a check
Be sure to examine the check before you start making marks on it. Once you start writing in pen, you can’t make a mistake and still use the check, so it’s important to know exactly what you’re doing before you begin scribbling away. Each line and section has its own special purpose that we’ll go over in this blog.
Also take note of the numbers on the bottom of the check. These digits act like elaborate ID number for your check, identifying where the money will be drawn from and which check requested the withdraw. These will come in handy if you ever need to make a wire transfer or link an online payment system to your bank account. There are three different at the bottom of every check: the Bank Account Number, the Bank Routing Transit Number, and the Check Number. Each set of numbers will be separated by a colon, but each bank puts these numbers in a different order. Here’s how you can identify them and what they do:
Bank Account Number: A number of varying length that will identify your bank account. Typically the longest number on the bottom of the check. You can generally identify this number through process of elimination.
Bank Transit Number: A nine digit number that identifies which bank the account belongs to. This allows them to find the right account to draw money from.
Check Number: A four digit number that also appears on the upper right hand corner of your check. This number will be different on every slip in your checkbook. If you accidentally write out a check that you don’t want to use, be sure to put an x or cross out this number to show that the check is invalid before ripping it up. This is not used when setting up wire transfers or direct digital links to your bank account.
A little complicated, but we made our way through it. Finally got the lay of the land? Then let’s start filling this puppy out!
Step Two: Date the check
Write the day’s date in the date section. Keep in mind that post-dating checks – that’s putting a future date on your check – is not necessarily a legal, but usually a bad idea. If you don’t have the funds in the bank when the check is cashed, it can create a real financial mess. At the least, you’ll bounce checks and possibly accrue overdraft fees. If the law can prove that you intentionally intended for the checks to bounce, then you can face criminal charges. In short, it’s generally a good idea to date checks accurately.
Step Three: Write in who you’re paying
On the “Pay to the order of” line, write out the full name of the person or company you’re paying. If you have an individual person as your landlord instead of a company, adding a middle initial to the name may be helpful. Be sure to put a full name there, rather than nickname. After all, the bank will be matching up the name on the check with the name on their account.
And remember, if you make out the check to “Cash”, then anyone with that check can cash or deposit it. So think twice before using anything other than the name of the person you are paying.
Step Four: Fill in the amount you’re paying
This part is pretty self-explanatory. In the box with the dollar sign, write the amount you’re paying the person or company numerically. Put the number as close to the dollar sign as possible to keep people from adding numbers in the box and stealing from your bank account. Make sure that you write these numbers as legibly as possible and clearly define the decimal point!
Step Five: Write out the amount in words
On the line beneath the payee section, write out the dollar amount of money you’re paying in words. For example, $135 would be written out as “One hundred and thirty five dollars.” If the amount includes cents, this should be written as a fraction. Mathematically challenged? Don’t panic! Cents will always be written as the number of cents over 100. For example, if you were giving someone $135.75, you’d write “One hundred and thirty five dollars and 75/100.” If you have any space remaining after writing out the amount, put a straight line to fill up the rest of the space.
Seem repetitive when you just wrote out the dollar amount numerically? This section is intended to combat against anyone misreading the numbers and accidentally taking the wrong amount of money out of your bank account.
Step Six: Stay organized with the memo line
Check writing seeming like an arduous process yet? Don’t worry. You’re in the home stretch! The memo line is intended to indicate what exactly you’re paying for. For example, if you’re paying your rent for the month of July, consider putting “July’s rent for [address here].” Paying a bill? Write in your account number. Though the memo section is optional, it’s extremely helpful when trying to pay bills. It keeps things from getting confusing in your own bank records and also helps your landlord/utility company to see what the check is for.
Step Seven: Authorize with your signature
You’re approaching the finish line! On the bottom righthand side of the check, you’ll find a signature line. Be sure to sign your full name in cursive. This is one of the most important steps. After all, a check without a signature is completely useless! Signing your checks right before sending it out AND ensuring that your signature is consistent every time you write a check is important for protecting yourself against fraud and forgery.
Sign your name on the line? Congrats! You’ve reached the finish line.
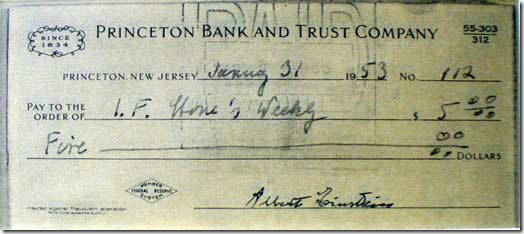
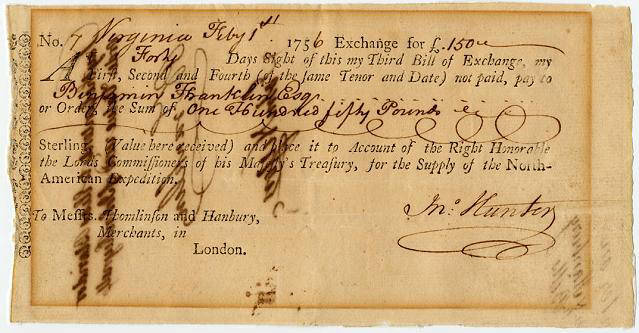
Awesome Check Gallery


Still need a place to write a check for?
[pl_button type=”important” link=”https://www.rentable.co/”]Take a look at our apartments![/pl_button]
Photo Credits: PSAcard